In this post I will show you how to build a mobile app with AngularJS and Ionic Framework starting from 0 up to the upload to Google Play Store.
The Ionic Framework allows the creation of mobile apps using HTML5. These applications are also known as hybrid mobile apps.
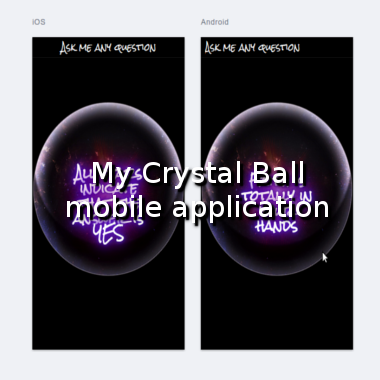
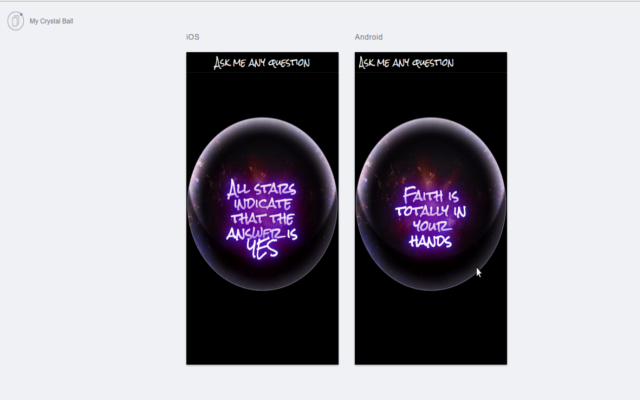
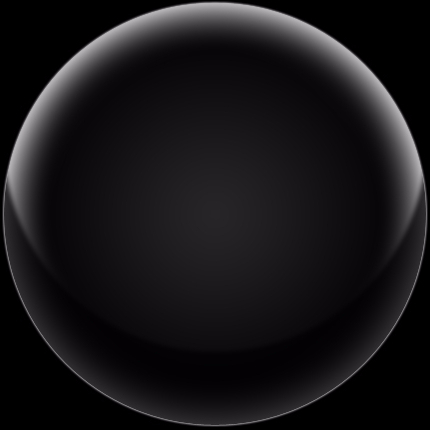
The approximate time for creating the mobile app is about 25 minutes without including the setup time for the development tools. The resulting application will be a Crystal Ball mobile app that “predicts” the future and it will look like this.
My Crystal Ball Mobile App
* The source code for this mobile app is totally free to use in any form you want.
Step 1 – Defining the mobile application specifications
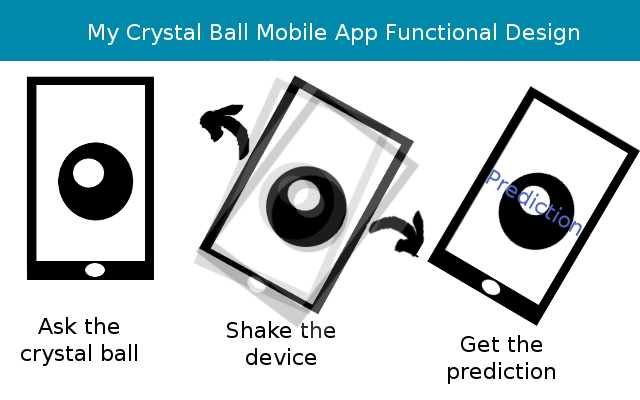
The name of the application is My Crystal Ball. Let’s define what the application will do. The usage scenario for the application is like this: the user will see an clear crystal ball, will ask a question and then shake the device. When the device is shaken it will present an answer to the question of the user and change the image of the crystal ball to a crystal ball filled with light.
So, we will need to develop a one screen mobile application, that displays images, displays a text and responds to device motion.
My Crystal Ball mobile app functional design
As development tools we will use the Ionic Framework which allows creating hybrid mobile apps with the help of a command line utility. Hybrid mobile apps use HTML5 and JavaScript. For handling user interaction we will use the JavaScript MVC library from Google – AngularJS.
Though Ionic allows building the mobile apps for multiple platforms, we will only focus in this post on the Android platform.
Step 2 – Installing the required development tools for developing a hybrid mobile app
Here are the required components to develop mobile applications using the Ionic Framework:
Step 3 – Creating the Ionic project – My Crystal Ball
Now that you have all components installed the hard part is all done. Let’s start using the Ionic Framework and create our mobile app project. In a command window key in the following:
ionic start MyCrystalBall blank
This will create a new folder in which it will place the new Ionic project called MyCrystalBall. The blank keyword indicates the name of the template application to use, which in our case is a very basic blank screen, single view application. The folder structure for the project will look somthing like this:
The www folder is where we will code our application. The main file for the application is index.html.
Now that we have the Ionic project created, we need to configure the platform for which we want to build the application, namely Android. To do this we simply have to key in the following:
cd MyCrystalBall
ionic platform add android
The first command changes the current folder to the project folder and the second will generate all the necessary components and the project for building the android app.
To test and debug your mobile app while developing you don’t necessarily need a device. You can use the embedded Ionic server which is started like this:
ionic serve
This will run the mobile app in the local browser. Since we have not implemented anything it will simply show a single view app with a blank page and a title bar.
Step 4 – Coding the Crystal Ball Mobile App
Looking into www/index.html we see that it includes www/js/app.js which is actually the main JavaScript application file. The app.js file defines an AngularJS module named starter. If you are not already familiarized with how AngularJS works, I highly recommend the AngularJS online training courses which will teach you most of what you need in just an hour or so.
Let’s begin by doing some changes in the code. First, let’s change the name of the main application module in the www/js/app.js from starter to myCrystalBallApp. Also, in www/index.html we should change the ng-app attribute of the body element from starter to myCrystalBallApp.
Step 4.1 – Creating the AngularJS Controller
Next, let’s create a new .js file which will hold our controllers. So, we will create www/js/controllers.js and in it we will define our one and only controller CrystalBall which will look something like this:
Since we have defined a new module in www/js/controllers.js we need to include this new module as a dependency in the main application module in www/js/app.js like this:
To modify the top title we have to make the following modification in the www/index.html:
...
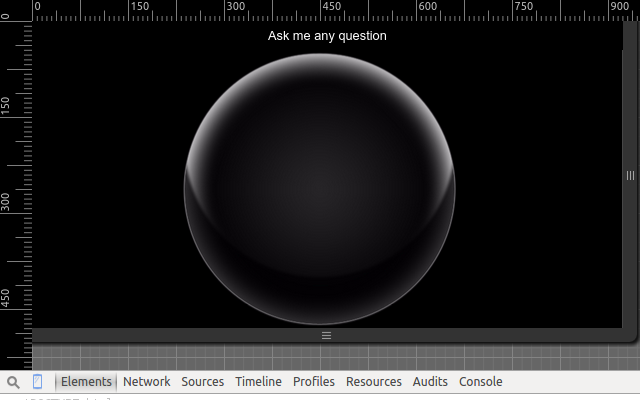
<ion-header-bar class="bar-stable">
<h1 class="title">Ask me any question</h1>
</ion-header-bar>
...
Step 4.2 – Creating the AngularJS view and binding it to the controller
We want to display a crystal ball in our application screen. To do this we will define a view and bind it to the CrystalBall controller that we defined earlier. In this view we will also place 2 images:
one of an empty crystal ball www/img/crystal-ball-empty.jpg
one hidden of a crystal ball with light www/img/crystal-ball.jpg
I must give a big thank you to PSDDude here for the images of the crystal balls which are free to use as long as you give credit.
We want the lit crystal ball to be hidden until the app gives the prediction for the future. We also want to have some smooth transitions between showing and hiding one or the other image.
We would like to have the crystal ball display right in the center of the screen. We also want to have it fully responsive, such that it is centered and re-sized properly when changing from landscape to portrait and back. This brings us to an ancient question:
How do you center an image vertically and horizontally in a div?
Before we answer this we have to make a few remarks regarding how hybrid app work:
Ionic framework is based on Apache Cordova, which uses a WebView for running the HTML5 application
On Android (also on iOS) WebView is actually the internal browser, a flavor of WebKit, BUT not quite Google Chrome
What works on Google Chrome might not work inside the WebView
To test what works, I am using my mobile phone’s browser to access directly the link provided by the command ionic serve -a (the -a switch will start the Ionic embedded web server listening on all network interfaces)
Having said that, after several iterations, I have reached the following solution for centering an image horizontally and vertically inside a div only using CSS and making it responsive:
first the HTML code placed in the ion-content element in www/index.html:
Now that we have our empty crystal ball placed in the centered, and the lit crystal ball prepared for fading in, we need a placeholder for displaying the answer to the user’s question.
We have implemented the view for our application, we have made the binding between the view and the controller, all that is left is to implement the controller.
In www/js/controller.js we will implement the CrystalBall controller. What we need is a function that will show the answer and the background lit crystal ball. For this we will need the following:
an array of possible answers from which we will randomly choose an answer to display
a boolean variable that indicates whether to show the answer or not
a function that chooses a random answer and shows it
a function to hide the answer
Here is the JavaScript code in www/js/controller.js:
angular.module('myCrystalBallApp.controllers', [])
.controller("CrystalBall",function($scope){
    //array of possible answers to choose from
	$scope.possibleAnswers =
	["All stars indicate that the answer is YES", "Faith is totally in your hands", "And the universe says NO"];

    //decides whether to show the answer or not; by default the answer is hidden
	$scope.showAnswerVar = false;

    //function that shows the answer;
	$scope.showAnswer = function(){
            //only start showing the answer if it's not already visible
		if (!$scope.showAnswerVar){
			$scope.showAnswerVar=true;

                    //choose an answer to display
			$scope.answer = $scope.possibleAnswers[Math.floor(Math.random() * $scope.possibleAnswers.length) ];

                    //after 5 seconds hide the answer
			setTimeout($scope.hideAnswer, 5000);
		}
	}

        //function to hide the answer
	$scope.hideAnswer = function(){
		$scope.showAnswerVar=false;

            //this is necessary because by
            //using setTimeout we stepped out of the AngularJS life cycle
		$scope.$apply();
	}
	...
});
We also need to make some changes in the www/index.html file. We have to bind the answer variable to the HTML content of the div.answer element by using the AngulrJS ng-bind-html directive. We also have to configure whether to show or hide the answer and the lit crystal ball based on the showAnswerVar variable.
For testing purposes in this stage we will trigger the display of an answer by clicking (or tapping) on the crystal ball. This is achieved by using the AngularJS ng-click directive.
The resulting code in www/index.html will look like this:
For changing a bit the look and feel we will change the fonts used for the title bar and for the answer. Searching through Google Web Fonts I decided to use a web font that looks like handwriting called “rocksalt”. I could include it from the online source, but that means that the mobile device should be online all the time which is not really ideal; therefore I have downloaded the webfont kit from here //www.fontsquirrel.com/fonts/rock-salt – the font is under Apache 2.0 license so we are good.
In the zip file downloaded there are the font files which I copied in the project folder under www/lib/fonts/rocksalt_regular_macroman and included the font in www/index.html like this:
Step 4.4 – Making the mobile app respond to shaking the device
Right now we made the application display an answer to the user’s question upon clicking (or tapping) on the crystal ball. Let’s see how we can make it such that when the user shakes the mobile device the answer will be displayed on the screen.
Most mobile devices (smartphones, tablets, etc) have a built in accelerometer. An accelerometer is a small chip that measures 2 axis or 3 axis acceleration.
Accelerometers can be used to detect the motion of the device. The Ionic Framework (actually Apache Cordova behind the scene) uses so called plugins to interact with various features that the device has (camera, SD storage, accelerometer, etc.)
What are Ionic (Cordova) plugins?
Ionic (Cordova) plugins are components that create a bridge between the Java native code and JavaScript. Using plugins one is able to call Java native code from JavaScript. The Java native code can directly call various features of the device
You can check out this link for a list of official Cordova plugins. Besides the official list, the community is creating tons of plugins for any conceivable task. The nice thing about the Ionic and Cordova projects is that they are open source. Further more, they encourage plugin developers to also keep the plugins open source.
Ionic offers the possibility to install a plugin directly from a GIT repository like this:
ionic plugin add [GIT repository url]
In our case we need a plugin that will allow us to detect device motion. More specifically to detect when the device is shaken. Fortunately, somebody has already thought about this and implemented a plugin specifically for this. It’s called Cordova plugin shake. So, to install this plugin just key in
This plugin will install in the background another plugin on which it depends: the official Cordova device motion plugin.
The shake plugin allows us register a listener for an event that is triggered when the device is shaken. For this we will use the global JavaScript shake object created by the plugin and call its startWatch. Inside the event listener we will call on our showAnswer function. The code goes in the www/js/controller.js file which will look like this:
One thing to note is that plugins that use various device hardware can only access that hardware when the device is ready. Therefore we are using Ionic to register for the ready event that is triggered when the device is ready. We also have to use the $apply function just like before to get back in the life-cycle of the application managed by AngularJS.
And we are done, the application now reacts to shaking the device by showing the answer text.
Step 5 – Final details: building the mobile application and preparing it for release
To build the application run the following command in the root folder of the project:
ionic build android
The build process creates a debug application package that is ready for testing. In my case the application file is platforms/android/ant-build/MainActivity-debug-unaligned.apk
We now have a working application. To run it on a device you can connect your device to the computer via USB, activate the USB debugging in your device developer options and then run the following command in your terminalin the root folder of the project:
ionic run android
Ionic will build the app, deploy it on the device and run it.
Change the application name
Let’s now do some detail changes. For example,if you run the application you will notice that the name of the application is not right. To change the name of the Ionic application edit the config.xml file from the root folder of the project change the following
widtget/@id – is a unique identifier which will appear in the URL of the Google Play App store when you upload the app there; also you cannot change it anymore after you have published it and any further application updates will have to have the same id;
change the name element to the name of the application “My Crystal Ball”
change the description and author information
Change the icon and splash screen
Now if you run the application you will notice that the name is My Crystal Ball, but the application icon and splash screen are still the default ones from Ionic. Let’s change that.
Icons and splash screen have to be different for each type of device resolution. Also they are different for Android and iOS. It can be quite a challenge to create them by hand. Fortunately Ionic offers a tool for automatically creating an icon and a splash screen.
You only have to create 2 files: resources/icon.png (192×192 px) resources/splash.png (2208×2208 px) and then run the following command in your terminal in the root folder:
ionic resources
and Ionic will create all the versions of the icon and splash screen for all resolutions and devices. If you want you can read more about Ionic icon and splash screen generation.
Make the mobile application full screen
One final look and feel detail that we can change is to make the application full screen. When running the application on the device you will notice that we have a top status bar where we see things like the signal strength, battery level and current time. The application would look much nicer if that status bar is not visible.
To do this we will need to install the status bar plugin which we can install by keying in the terminal window in the root project folder the following:
ionic plugin add org.apache.cordova.statusbar
Notice that we added the plugin using its identifier. We can do that because it’s an official plugin from Cordova’s repository.
Now let’s use the status bar plugin to hide it and make the application full screen. For this we will need to call the hide() function of the StatusBar object created by the plugin. We will do this www/js/app.js like this:
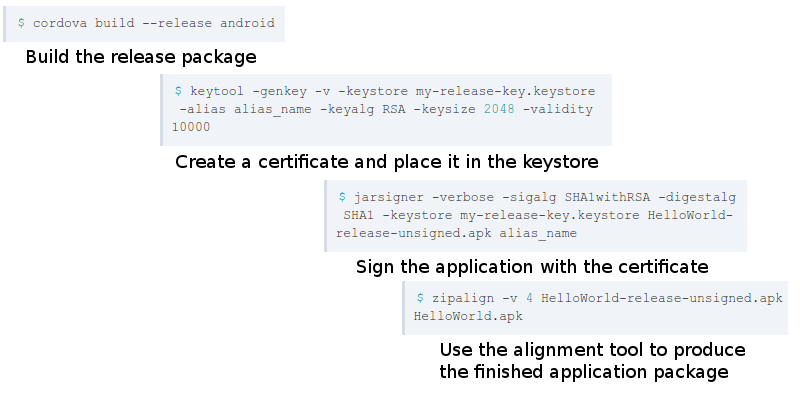
Step 5 – Build the release and upload to Google Play Store
The application is now ready to be released. The quickest way to prepare the .apk application package file for upload to Google Play Store is to follow these steps:
You can see more details about this in this article about mobile application development and specifically about publishing to the Google Play Store. The article covers all the steps you need to publish your app.
If you just want to install the application you can download and install My Crystall Ballit from Google Play Store
My Crystal Ball Mobile App APK
To use just ask a Yes/No question and shake to phone to get the prediction.
Don’t ask the same question or you will confuse the “complex prediction algorithm” 🙂
MyCrystalBall is a hybrid mobile application developped using AngularJS and the Ionic Framework. It’s an application developed for demonstrating how to build a mobile application from 0 using the 2 frameworks.
Again, here is the GIT repository for the My Crystal Ball mobile application source code. Please share this article if you found it useful and don’t hesitate to send me questions and remarks.
did you solve this? Please try to remove and re-install the shake plugin and carefully watch if there is any error upon addition. Please mind that the plugin version and the cordova version need to be compatible


I just started to learn how to make a mobile app and I found this tutorial quite useful.
Also I downloaded the app and works great 🙂
Hey Jamie, thanks! I’m glad it helped
Hi!
shake is not working on my device android 4.2.2, ionic 1.710 and cordova 5.40
I followed the tutorial but when I execute ionic run android it installs the app correctly but it do not recognize / react when I shake the phone.
I have been looking but nothing helped me. Do you have any idea where to look or what to check in order to know why it is not working?
thanks for your help!
Hi Manuel,
did you solve this? Please try to remove and re-install the shake plugin and carefully watch if there is any error upon addition. Please mind that the plugin version and the cordova version need to be compatible