In this Ionic App Tutorial I will show you step by step how to create a mobile application for Android. The application allows quickly buying public transport tickets via SMS. The source code for this application is available on GitHub Download
Prerequisites:
- NodeJS
- npm – package manager for NodeJS
- Cordova & Ionic Framework (install with
npm install -g cordova ionic)
Once you have all these installed we can get started.
What will the mobile application do?
First, let’s describe the functionality that we want to implement in our Ionic project. We will be implementing a mobile application that will allow the user to easily purchase public transport tickets via SMS. Of course the user can send an SMS himself, so we will have to implement the application to make that easier for him.
For this particular application we will take the case of Bucharest public transport that offers 3 types of tickets that can be purchased via SMS:
- 1 day pass – a ticket for the whole day. To buy this ticket you have to send an SMS to the number 7458 with the text “A”
- 1 way ticket for Express line 780. To buy this ticket you have to send an SMS to the number 7458 with the text “E780”
- 1 way ticket for Express line 780. To buy this ticket you have to send an SMS to the number 7458 with the text “E783”
To make this as easy as possible for the user the application we will implement will contain one screen with 3 buttons, one for each type of ticket. When the user clicks one of the buttons the app will automatically send the SMS with the right text and therefore purchase the ticket.
Now let start implementing our Ionic project.
How to create the Ionic project?
To start creating the Ionic project we will use the Ionic CLI tool, which is the command tool provided. With a few commands we can setup and configure the Ionic project. Let’s start by keying in:
ionic start tickets-via-sms tabs
This will start downloading everything required to create a new Ionic project in a folder named tickets-via-sms in the current folder. The tabs at the end instructs Ionic CLI to use the tabs application template which is a template for mobile application using tabs.
After Ionic CLI finishes you should switch the working directory to the newly created application directory by keying:
cd tickets-via-sms
How to fire up the Ionic application for the first time?
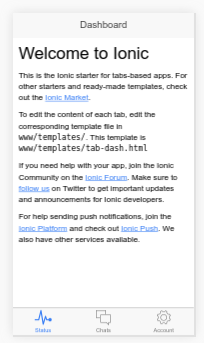
Starting the Ionic application for the first time is what I usually do immediately after the project is created. I do this to check that the project was properly created. To fire up the Ionic application key in:
ionic serve
You might be wondering how will the application start since you are on a computer and the application you make is for mobile. Well, ionic serve will fire up the application in the browser since Ionic is a framework for developing hybrid applications. Most of the things will work the same in the browser as on the mobile, there are however things that will only work on the mobile, but we will get to that later.
Here’s how the app looks in the browser:
How to replace the Ionic template application screens with our own?
The Ionic project created from the tabs template has 3 tabs by default: Status, Chats and Account. These are fine as an example, but not so fine for our app. Let’s see how we can replace the existing tabs with our own.
We will start by removing the existing tabs and create only one tab for start, which will be the Buy ticket tab.
Adjust the structure of the Ionic application states
First lets stop the ionic serve command by hitting Ctrl+C. We do this because we are changing the app and Ionic will by default reload the page of the app as we do changes. This is fine for minor changes, but we will do some pretty dramatic changes. Let’s start modifying!
If we look into the www/js/app.js file we will see that Ionic uses AngularUI Router which uses the concept of states. In the config method of our application module, $stateProvider is injected and used to configure the screens (or tabs in our case) of the application. That means that a relationship is configured between the URL, view template and Angular controller for all states of the application.
There is an abstract state which is the tabs holder. That one we need, but the rest can go away. Instead we will put our own states/tabs.
Let’s define our buy-tickets state. In www/js/app.js we remove the states under the abstract state tab and add our own. The resulting code will look something like:
  ...
  $stateProvider

  // setup an abstract state for the tabs directive
    .state('tab', {
    url: '/tab',
    abstract: true,
    templateUrl: 'templates/tabs.html'
  })
    .state('tab.buy-tickets', {
    url: '/buy-tickets',
    views: {
      'tab-buy-tickets': {
        templateUrl: 'templates/tab-buy-tickets.html',
        controller: 'BuyTicketsCtrl'
      }
    }
  });
  ..
We also need to replace the default active tab with our own by changing the line below the states definition to this:
$urlRouterProvider.otherwise('/tab/buy-tickets');In the template used for the tabs holder we need to remove the tabs that we don’t need. For this we will edit the file www/templates/tabs.html and remove the ion-tab tags that we don’t need and add our new tab. The result will look something like:
<ion-tabs class="tabs-icon-top tabs-color-active-positive">
 <ion-tab title="Buy ticket" icon-off="ion-ios-pricetag-outline" icon-on="ion-ios-pricetag" href="#/tab/buy-ticket">
  <ion-nav-view name="tab-buy-tickets"></ion-nav-view>
 </ion-tab>
</ion-tabs>
We used ion-ios-pricetag-outline and ion-ios-pricetag for the off/on state of the tab icon. These are CSS classes from the Ionic Framework defined for icons. For the full list of icons see the Ionicons page.
Creating the view for the Buy tickets tab
In our configuration above we have created the tab.buy-tickets and associated it with a view template template/tab-buy-tickets.html. However that file does not exist so we have to create it. We will create an empty tab like this:
<ion-view view-title="Buy Tickets">
 <ion-content class="padding">
 </ion-content>
</ion-view>
Creating the controller for the Buy tickets tab
Also in the configuration we have configured the BuyTicketsCtrl controller associated with our main application view. So, we have to created it. For this we should edit the www/js/controllers.js file and remove the controllers for the tabs we have removed above, then add our controller. We will end up with something like this:
angular.module('starter.controllers', [])
.controller('BuyTicketsCtrl', function($scope) {});
You can now fire up the application again by using ionic serve. The app should look something like:
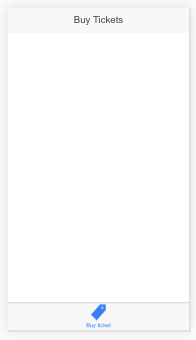
Congratulation on completing this step
We have now successfully replaced the tabs that come with the Ionic tabs template application. As you can imagine, the application doesn’t do much because we have to implement the functionality.
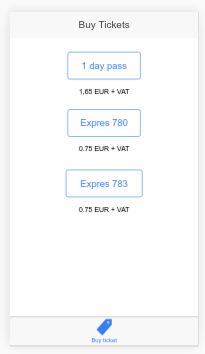
How to add buttons in our main application view?
In this project we are using Ionic Framework v1, so we will refer to the documentation for that version. Let’s see how we can add the 3 buttons we need in our main application tab. Each button will allow purchasing one type of ticket. To add the buttons we have to edit the template associated with our tab www/templates/tab-buy-tickets.html and modify it to look like the following code:
<ion-view view-title="Buy Tickets"><ion-content class="padding"><div class="row"><div class="padding text-center col-offset-25 col-50"><button class="button button-outline button-block button-positive">1 day pass</button><div><small>1,65 EUR + VAT</small></div></div></div><div class="row"><div class="padding text-center col-offset-25 col-50"><button class="button button-outline button-block button-positive">Expres 780</button><div><small>0.75 EUR + VAT</small></div></div></div><div class="padding text-center col-offset-25 col-50"><button class="button button-outline button-block button-positive">Expres 783</button><div><small>0.75 EUR + VAT</small></div></div></div></ion-content></ion-view>
And this is how the app should look like now:
How to add functionality to the buttons?
Pressing the buttons does not do anything right now. Let’s change that. When the user presses one of the buttons we want to buy the type of ticket associated to that button. So, let’s add a click handler for each button with the code associated for each ticket like this
Modify the code for the buttons in www/templates/tab-buy-tickets.html to look something like:
...<button ng-click="buyTicket('A')" class="button button-outline button-block button-positive">1 day pass</button>...<button ng-click="buyTicket('E780')" class="button button-outline button-block button-positive">Expres 780</button>...<button ng-click="buyTicket('E783')" class="button button-outline button-block button-positive">Expres 783</button>...
Notice the ng-click attribute? That indicates that a function buyTicket() should handle the click event for the button. As a parameter we send the code for the ticket associated to the button.
But where do we define the function buyTicket()? In the controller. Let’s see how to do that.
How to handle actions in the application controller?
Remember that above we have created a controller associated with our tab named BuyTicketsCtrl. We did that in the www/js/controllers.js file. The controller was empty, but now we will add our buyTicket() function in there. Ionic uses AngularJS so we are actually working with Angular JS controllers. Go to the AngularJS website if you want to know more about AngularJS controllers.
For our app we will keep it really simple. Angular works with something called dependency injection. That sounds like something that might hurt, but actually takes a lot of the pain of managing dependencies away. The idea is that if you need to use a certain module from Angular you don’t have to write code to import it, load it etc. you just mention it as a dependency and auto-magically you have access to it.
In the case of our BuyTicketsCtrl we need to create the buyTicket() function and make it accessible to our view by putting it in the current context. The current context in Angular is called scope and we inject it by having the $scope parameter passed to the BuyTicketsCtrl controller. So, we need to modify www/js/controllers.js to add our function as a member of the $scope variable like this:
....controller('BuyTicketsCtrl', function($scope) {$scope.buyTicket = function (type){alert("Buying ticket: "+type);}})...
If we now test our application we will see that pressing one of the buttons will display an alert with the type of ticket chosen. That is all fine, but what we actually want is to send an SMS and actually buy the ticket. Let’s move to the next step of this tutorial and see how to do that.
How do we send an SMS from an Ionic application?
Our application is meant to run on a mobile device, most commonly a phone. Amazing as it sounds, the mobile phone used to be mainly used for making phone calls and occasionally texting or sending someone an SMS. So, the functionality is there, but how do we access it?
We need a mechanism to make the bridge between our JS code and the mobile features like SMS. Well Ionic takes care of that in a very elegant way: Ionic plugins.
What are Ionic plugins?
An Ionic plugin is a combination of mobile devices native code implementation and JavaScript code to allow communication between the JS code of the Ionic application and the features of the mobile device. Ionic plugins create an API-like mechanism for accessing various device features like: camera, SMS, etc.
So, what we need is to find a plugin to allow us to send SMSs and to install it. A quick search on the internet after ionic plugin sms brings up several options. For this tutorial I will use the SMS plugin provided by Cordova. To install the plugin we will use the Ionic CLI tool by keying in:
ionic plugin add https://github.com/cordova-sms/cordova-sms-plugin.git
This will install the plugin which we can now use in our code. If we want to follow good programming practices it’s a good idea to put the functionality for sending an SMS in a dedicated component. The best fit for such a component is the service layer.
How to add an SMS service to our application?
Let’s edit the www/js/services.js file and remove all the factory entries. Then we need to add our own service which we will name SMSService and will look like this:
angular.module('starter.services', []).service('SMSService', function() {this.sendSMS = function(number, message) {//CONFIGURATIONvar options = {replaceLineBreaks: false, // true to replace \n by a new line, false by defaultandroid: {intent: '' // send SMS without open any other app}};var success = function () { alert('Message sent successfully'); };var error = function (e) { alert('Message Failed:' + e); };sms.send(number, message, options, success, error);};})
Great! We now have a SMSService on which we can call the sendSMS() function to send any message to any phone number.
Also as a best practice we should separate the concerns that means that we should dedicate pieces of code to specific actions. Our app allows buying tickets so it is a good idea to create a service dedicated to that action. We do this also in the www/js/services.js file by adding the following code:
...
.service('TicketService', function(SMSService) {
 this.buy =function(type){
  SMSService.sendSMS(7458,type);
 };
})
This gives us the TicketService with a buy() method that will perform the buy operation by sending out the SMS to the transport company phone number. As you see the buy() function receives the type of ticket as a parameter.
Also we notice that the TicketService makes use of the SMSService injected as a parameter.
There’s only one more thing left to do and that is modifying our controller to make use of our newly created TicketService. Let’s inject it in our BuyTicketsCtrl from www/js/controllers.js and call on the TicketsService.buy() function like this:
...
.controller('BuyTicketsCtrl', function($scope, TicketService) {
 $scope.buyTicket = function (type){
  TicketService.buy(type);
 }
})
...
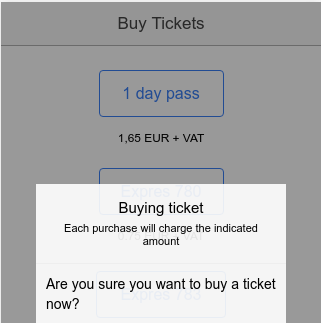
We can make one extra modification to ask our user to confirm that they really want to buy the ticket. We don’t want the SMS to be sent out by mistake as it will charge the user every time. We will inject $ionicPopup in our controller which will allow us to display a confirmation popup. Modifying the file www/js/controllers.js our BuyTicketsCtrl will end up looking like this:
.controller('BuyTicketsCtrl', function($scope, $ionicPopup, TicketService) {
    $scope.confirmBuyTicket = function(confirmationCallback) {
        var confirmPopup = $ionicPopup.confirm({
            title: 'Buying ticket',
            subTitle:'Each purchase will charge the indicated amount',
            template: 'Are you sure you want to buy a ticket now?'
        });

        confirmPopup.then(function(res) {
            if (res) {
                confirmationCallback();
            } else {
                //don't do anything
            }
        });
    };
    $scope.buyTicket = function(type) {
      $scope.confirmBuyTicket(
        function(){
          TicketService.buy(type);
        }
      );
    }
})
So, we added a new function named confirmBuyTicket() with a callback as parameter. A callback is a function passed as a parameter that will be called depending on the conditions in the function called initially. In our case we only want the TicketService.buy() function called when the user confirms that they really want to buy a ticket.
Congratulations on completing the final step for implementing our Ionic application!
Now that we have the application, what would be very nice is to see it in action. To do that we need to prepare it for deploy on a real device and maybe also publish it to an application market place like for example the Google Play Store.
How do I deploy my Ionic application to my Android device?
Please keep in mind that the Ionic Framework is able to build hybrid application that can be deployed over a wide range of mobile platforms including Android, iOS, Windows, Tizen, etc.
First of all we need to inform Ionic that we want to deploy our application on an Android device. To do that we need to run the following command in the application folder:
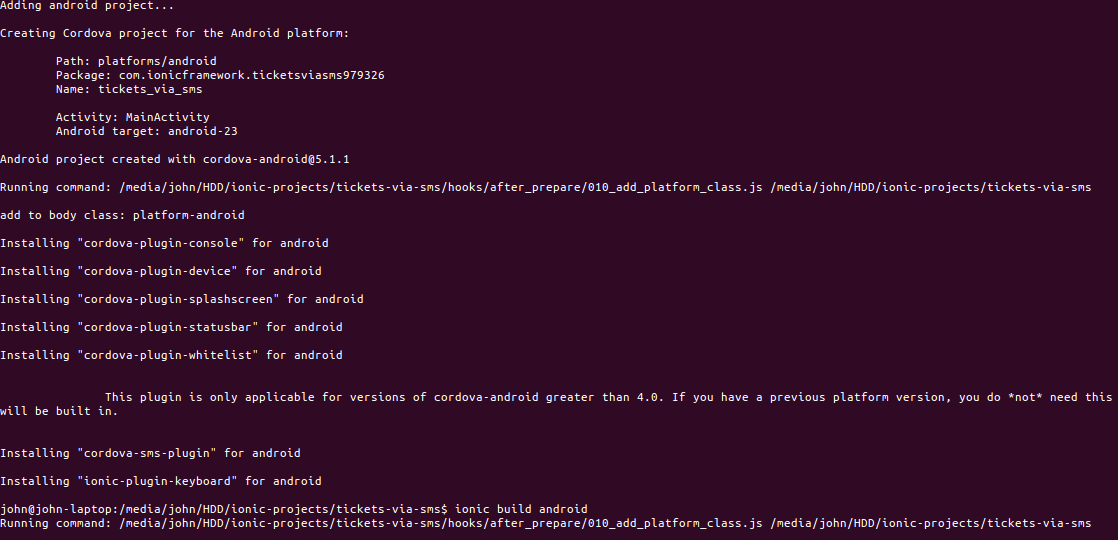
ionic platform add android
This will start downloading and installing everything necessary to compile and deploy our application on an Android device. If everything goes well the console should look something like this.
Now let’s test the application on a real device. To do this you need to take the following steps:
- Connect your Android device via USB to your computer
- Make sure you have USB debugging enabled on your device
- Run
ionic run android
Voila! The application starts on the mobile device.
What’s next?
Well, we could make the application available to everybody by publishing it. That is outside the scope of this tutorial so if you are interested in that I suggest you take a look at this section about Publishing to the Google Play Store.
Hope you have enjoyed this step by step tutorial. If you have any questions or remarks please leave me a comment.
[…] Also, if you are looking to learn Ionic programming using step by step tutorials for creating application I recomment the tutorial Creating mobile app for buying public transport tickets via SMS. […]