Change The Domain Name Of Your WordPress Website
Having to changing the domain name for your WordPress website can be scary, but sometimes you just have to. Either as part of a re-branding process or other reason, it’s clear that you landed on this page because you need to change the domain name for your WordPress website. Moving a website to a new domain is easy when you know what to do.
Re-branding your business can be a nerve wrecking experience. There’s always the risk of loosing your old customers. But, if you decided there’s no other way, you should really give it a good thought. Make the right choices for your new brand. You should really check out this article about brand imagery and how important it is for the success of your business.
Migrate Your WordPress Website To A New Domain
We will transfer our WP site to a new domain. We will move the site from domain x.com to domain y.com while keeping the Google ranking for all pages already published on domain x.com.
The result we want
After we move the WordPress site to the new URL, if users go to the old URL they should be redirected to the new domain. To move WordPress to a new domain we will have to do the following:
- Register the new domain in the DNS to point to the existing server
- Change the WordPress domain name settings
- using 301 Permanently Moved redirects to keep Google page ranks
- ask Google to change the domain name in Google Webmaster Tools
Let’s get started
Step 1. Register The New Domain In The DNS To Point To The Existing Server
So, we have the old domain x.com and have just bought y.com from one of the domain dealers. No matter which one that is we should get access to a screen where we can manage our new domain. One of the things we should be able to manage are the DNS entries for that domain.
DNS or domain name servers are servers that store the information linking a domain name, y.com in our case to the IP of the physical machine where we host our website. Here’s how such a screen might look:

As we see here, we have several DNS entries of various types, names and values. It looks complicated, but it’s actually very simple. Let’s look at the entry with the name www. The type is CNAME which means it’s a Canonical Name entry. Let’s not into details about what that means. What is important to know is that this entry instructs the DNS to link www.y.com in our case to @. But what is @? Well that’s actually a reference to another entry, more specifically the entry of type A with the name @ and the value 192.27.81.22 (the IP of our imaginary server).
Bottom line is that we indicate that www.y.com should point to the IP indicated in our A record. Of course in your case you should put the IP of the server where you already host your old www.x.com WordPress website.
Step 2. Change the WordPress domain name settings
Changing the domain name is not as easy as when you change the permalink in WordPress for a page or post.
After making the changes in the DNS records if we try to access www.y.com our website is loaded correctly. However, we notice that the browser immediately switches addresses to the old www.x.com website.
Why is that?
Because WordPress is self aware… well, not exactly but it does know that its website domain name was www.x.com at the time WordPress was installed.
How do we change that?
Well, we could remove everything, install WordPress again on the new domain and put in all the pages and posts back in on the new website, but that is a bit too extreme.
We could also change the site URL in the WordPress MySQL database. But that’s also not too nice of a solution.
The easier way is to simply change a few settings of WordPress. Let’s do a WordPress change of the host URL. Go to Settings > General and change both WordPress Address (URL) and Site Address (URL) to reflect our new www.y.com domain then Save.
The screen for site settings looks like this:
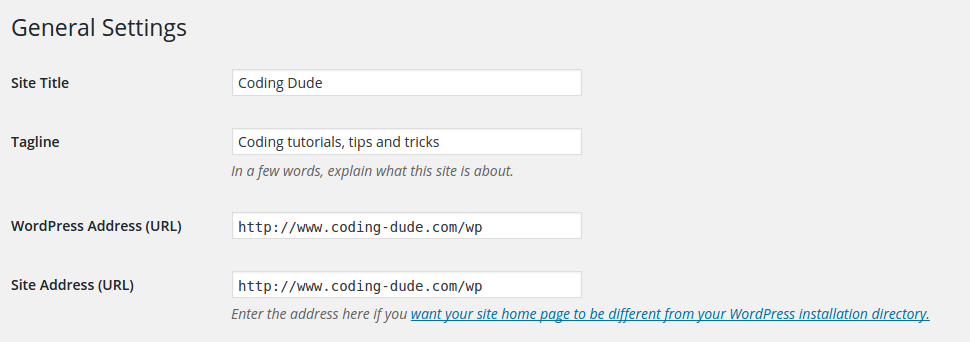
This should work fine in a standard WordPress installation.
If you have a multi-site WordPress installation however, things are a bit more difficult. Essentially you will have to manually go and change a few entries in the database. I will not go into details here on how to do that, but if you are interested you can read this article: How to change a multisite primary domain
We are almost there with the move of our WordPress site to the new URL.
Step 3. Redirect existing pages using 301 Permanently Moved redirects to keep Google page ranks
So, accessing www.y.com now works, and the browser does not change the address to the old domain name. However, if we try to access an old post via the old URL like www.x.com/my-wordpress-post instead of getting the post content on the new domain www.y.com/my-wordpress-post we will be redirected to the homepage on www.y.com. Why indeed? That’s because WordPress sees all incoming request on the old domain as invalid, and tries its best to resolve it by leading the user to the homepage of the new domain.
To fix this we would need to do a redirect from the old domain page to the new domain page. If we look at Google’s recommendations on how to properly change an address of a website page that’s already been indexed we will find that we have to do a 301 redirect.
What is a 301 redirect?
Every time a page is accessed on a website the server first replies with an HTTP status. These statuses have numbers attached to them. For example:
- Status 500 Internal Server error means that there is a server side error and the page was not properly returned from the server
- Status 400 Not found means that the particular page accessed does not exist on the server
- Status 301 Permanently Moved indicates that the accessed page has been permanently moved to another location (URL); the new URL is indicated as an extra attribute of the status
- Status 302 Temporary Moved indicates that the accessed page has been temporarily moved to another location (URL); the new URL is indicated as an extra attribute of the status
In our case we have to use the 301 redirect because we want to indicate that all our pages have permanently moved from the old domain to the new domain. One way to do that is by using the .htaccess file. This file is found in the root of the WordPress folder and should already contain several entries. We need to add the following lines:
RewriteEngine On

#redirect all website traffic to new domain
RewriteCond %{HTTP_HOST} ^(?:www\.)x\.com$ [NC]
RewriteRule ^ //www.y.com%{REQUEST_URI} [L,R=301]
Please note that RewriteEngine On might already be present in the .htaccess file, so we don’t need to add it. The line starting with # is just a comment and the next two lines indicate that any incoming traffic on any page of www.x.com should be redirected to the same page URL on www.y.com using the 301 HTTP status.
Done! Now we have successfully completed the migration of our WordPress website from one domain to another.
Step 4. Change Google Site URL – Ask Google to change the domain name with Google Webmaster Tools
There’s only one more thing to do: inform Google about the change. This step is optional, but highly recommended. Optional because due to the 301 redirects Google will progressively re-index the website and eventually all pages will show up in search results pointing to the new domain. However there is no guarantee for how long this will take and Google might choose to decrease the ranking of some pages because it might see them as duplicated content on two domains.
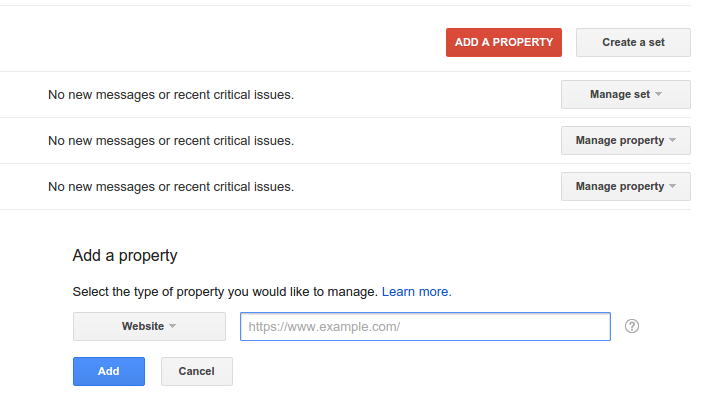
To inform Google about the domain name change we have to use the Google Webmaster Tools. First we will add and confirm our new domain. To do that we have to go to the Webmaster Tools dashboard and choose ADD PROPERTY
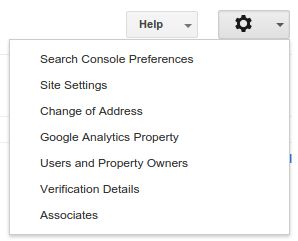
After adding the new domain name as property we have to go to the old www.x.com domain in the list of domains from the Google Webmaster tools dashboard and click the gears icon on the top right then use the Change of Address option.
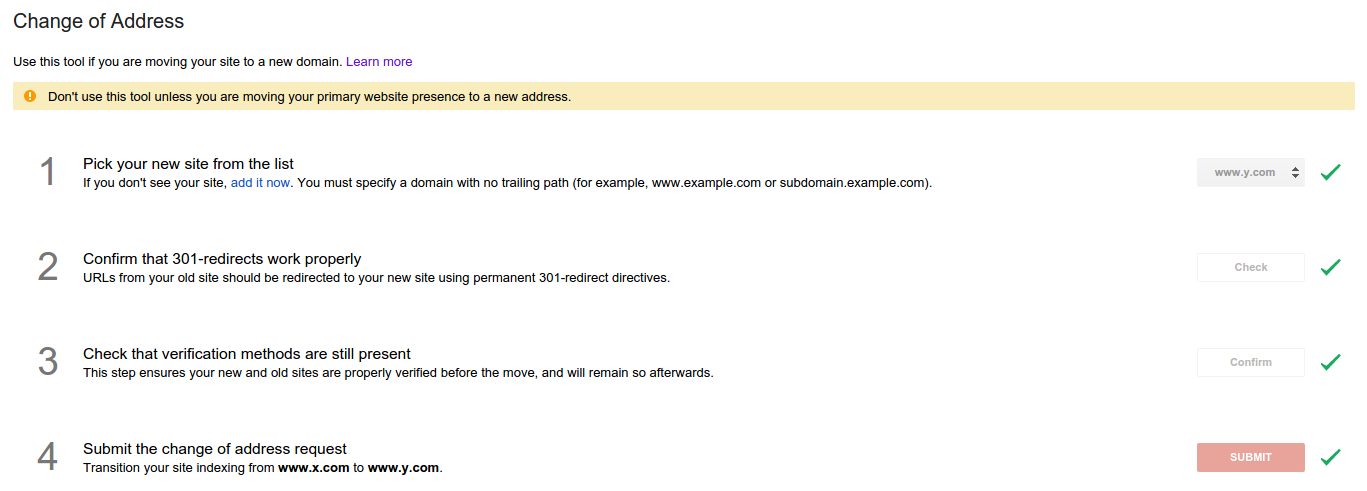
Then select the two domains: the source domain and the target domain like this:

As you can see point 2 asks you to confirm that all 301 redirects have been properly configured. We already did that in Step 3 so we should be good to go. We can click the Submit button and the request will be posted to Google. It takes approximately 48 hours for the request to be processed after which you will already notice that all pages show up in the search results under the new domain.
What is even greater is that the Google Page Rank for all pages is kept almost intact. So if you ranked high for a webpage on the old domain you will rank similarly for the new domain. I say “almost” and “similarly” because you have to realize that Google Page Ranking is influenced by a wide range of factors including the relevance of keywords found in the domain name too. Also, it’s very possible that your website is linked from other websites using the old domain. The 301 redirect does it’s job so that the links will still work properly, but you will better get in touch with as many websites as possible to inform them that you have changed the domain name of your website. It’s probably also a good idea to inform your subscribed users about the change so that they properly access your site.
I hope you find the info in this post useful and if you have any comments or questions please use the comments area below.